Part #3B -- Templates / Holes
![]()
( This is a big page to load )
The voice box hole, quite possibly the biggest pain in the AS* ! of all the holes. This is an area where you will be looking at most of time (hopefully not when your driving.) You cant miss this area, smack dab in the middle where everyone can see it, so you had better do a good job on this part.
You will need to have the dimensions of your voice box to cut out a hole the appropriate size. Mark on the dash your dimensions and cut out the hole. This is where I majorly screwed up on mine, I cut to big of a hole, but I recovered. Next, you will want to remove enough fiberglass to fit in a piece of Plexiglas that will cover your entire voice box, you don't want to make the hole bigger but you want to make the hole deeper. I used a belt sander to deepen this hole. Make a template of the voice box hole you made, and cut out 2 pieces of Plexiglas that will cover this area 1 for sanding and finishing, 1 for the actual cover (put this one in a safe place.) The voice box cover should be flat and mold in to the area around it, it becomes part of the dash.
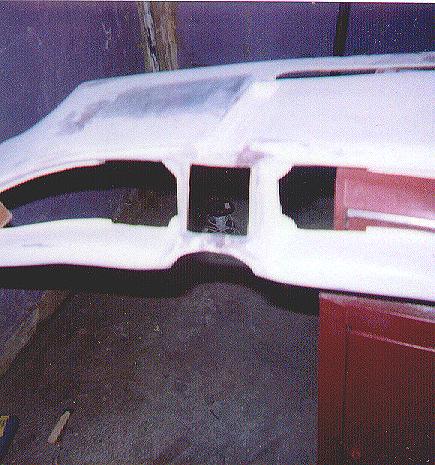
To do this you will need to place the piece of Plexiglas in the hole (the piece for sanding and finishing.) Tack this piece of Plexiglas in with a little bit of hot glue. Get some fiberglass body filler and mold the Plexiglas into the dash by filling in gaps around the cover. It doesn't matter if you scratch or sand a little off the cover for the voice box, this is why you made two. The cover should mold into the dash on all 4 sides, this filling and sanding will take a long time to get it just right, I think that I spent 2-3 days on this part. When your all done pop out the Plexiglas cover and test fit your other piece that you made along with the one you just popped out.. This cover piece should fit perfectly. Your progress should resemble something like below. ( notice my SCREW UP, the lack of a defroster duct.)
Now were going to mount the voice box itself, we are doing this now to create all the mounting holes. Since there was no instructions of any kind, any where, I came up with the following to mount a voice box.
"Coat hanger" two simple words, a simple idea. I mounted 3
short pieces of coat hanger wire on to my voice box, one on top in the center and two on
the bottom at either corner. I used a nut & bolt to screw the top one to the
"dip" in the dash where the lights go, and the other two on each side of the
steering column hole on the dash. You can bend, move around, and do what ever it takes to
get it to fit, just make sure it is level and square in the voice box hole. Also be
shure you are going to have enugh room for the steering cloum with those pices of wire
there.
With the voice box installed temporarily, now would be a good time to finish off the voice
box cover. To accomplish this you need to mask off (with painters masking tape) where the
lights are on the voice display, and the 5 lights on either side of it. You will need to
transfer the masking tape to the back of the cover using the masking tape on the front as
a template. Then all you do is paint the back
of the Plexiglas cover where you put the masking tape, remove the tape and Walla, it's
done. I tried to tint the front of my Plexiglas cover with automotive window
tint. It looked good for a few days, then it started to bubble up from the heat in
the car. So that was kind'a a bad idea, don't do it.
Set this finished cover somewhere safe, you wont need it until after the dash is painted. Remove the voice box.
Now it's time for the TV hole, if you don't have a TV for your dash, go get one now ( I'll wait.) There are two ways to mount a TV one is to remove it from the case it comes in and directly mount the picture tube to the dash this looks the best, but someone could get seriously zapped if they touched the high voltage fly back coil or wire. You can also leave it in the case it was manufactured in, which is safest.. I made mine so that the whole thing sticks through the dash in it's original case, so I can get to the controls. Now, after driving it for awhile I found this to be a bad choice. I should of recess mounted it, maybe someday I'll get around to it. Anyhow, make a template of the area on your TV that you want to show, I would suggest just the picture tube while leaving the TV in it's case. Place the template on the TV area of the dash making sure that the TV case wont be sticking underneath the dash or look unsightly. Mark the area to be cut and cut it out. I'll show you how to mount the TV in the "Electronics" section of the dash project.
How about those speakers in the top of your dash ?? Want to hear them? Here we go:
I came up with a rather easy way to get these suckers on top the Knight dash. You will need a pop rivet gun, small rivets, and 4 pieces of sheet metal about 1-1/2" x 8". First you will need to cut out the holes in the top of the dash. On the dash I got from Mark there was indention where the factory speaker grills should fit. The indention's weren't quite right so I had to move them around a little. To do this you will need to get the factory speaker grills off the factory dash, they should just pop right out. Next you will notice that the defroster duct has a bit of a curve to it. This curve continues on to the speaker grills, so you need to lay the factory grills on your knight dash line them up with the curve, then trace around them. Now you need to cut out the area where the grills will fit, use the Dremel for this. Note: cut along the inside of the marks to get a good fit. Cut slowly and the result will be a better fit or the speaker grill. Check out the awesome graphic below :
Now that you have the speaker holes cut, lay in the speaker covers, trim or sand the holes in the dash until they grills fit correctly. Now we need to fasten them, this is where the pop rivets and sheet metal come in to play. Place a piece of the metal on the left and right side of the holes, making sure to leave enough of a ledge so the speaker grill can sit on top of the metal. Drill through the metal and the dash from underneath then rivet the metal to the dash.. Make sure to have the head of the pop rivet underneath the dash. Once the metal is attached place the speaker grills in their holes and drill from behind the dash 4 holes, for pop rivets in each corner of the speaker grills. Now all you have to do is pop rivet the speaker grills to the metal with the head of the rivet facing underneath the dash. Notice the pic below :
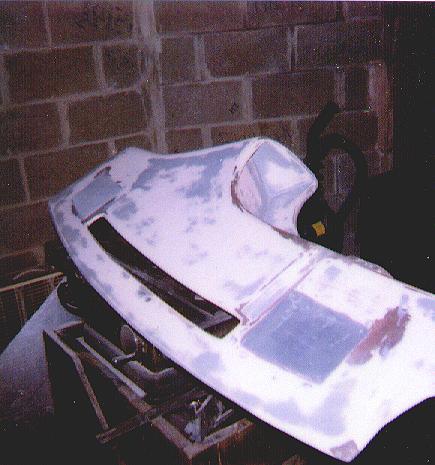
If you got a little crazy when you cut the holes you can add body filler around the speaker grills and rivet holes. The speaker grills probably will be higher than the dash, so when you start sanding and finishing your dash you can sand down the speaker covers to the direct contour of the dash, I did this with a belt sander and it looks super groovy. You cant really notice the butt ends of the rivets in the speaker grill after it's painted. After your done it should look like the pic below. (With the exception of the defroster duct missing)
This would be a good point to cut out the defroster holes at the bottom of the defroster duct on your dash and to drill the holes for the mounting screws so you can fasten the dash in the factory locations. I can not give details on this part, because I totally screwed up my dash by completely sawing it off.
Congratulations, you have cut all the "big important holes." ( And I don't have to write about it any more !! Woo Hoo !! )
© Property of Knight Technology http://knighttech.tripod.com