Part #4 -- Starting da' Finish
![]()
Pretty good pun Hugh? At this point you should have all your holes cut in your dash. Don't forget to add any holes you may need for stuff that you wanted to customize your dash with. To get a good paint job on your dash you will need to sand, sand, sand, fill, fill, fill and then do it all over again.
I used a belt sander with a 100 grit belt to get it started on the flat surfaces, and a palm sander or manual hand sanding with the same grit paper for the rest.
Just a little note not related to much of anything here: I had this page almost completed when Windows decided to f**king crash, and I lost it all, with the exception of the above text, damn that pissed me off. Fu**ing Windows 98 !! @#%#$^ !!! Ok, I had a cigarette, now I'm all better.
It is important to "rough up" the surface of the tooling gel of your dash to get the body fillers to stick to the surface. Speaking of body filler I used Bondo type filler to do my dash, both fiberglass filler and regular type filler. The fiberglass filler should be used for the majority of your work, it is allot stronger than the regular type. This filler is thick, green, and contains particles of fiberglass. The regular type of filler should be used for small areas with trouble spots such as air bubbles in the fiberglass, around the speaker grills, and any areas that require great detail, this stuff is easier to work with compared to the fiberglass filler. You can even use J.B. Weld if you really screw up as I did when I made my voice box hole way to big.
When working on your dash you will notice several spots that need serious help, I made the following picture to show you where I had trouble spots on my dash :
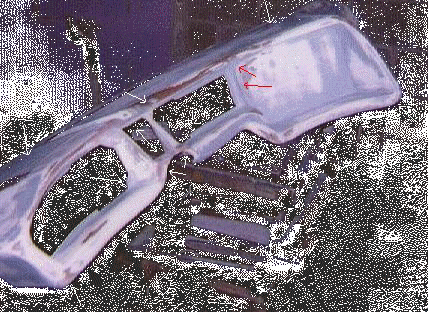
The majority or the problems come from air bubbles that are trapped in the dash as it is being made in the mold. When the fiberglass is laid up in the mold and the epoxy is set, sometimes air can get trapped in these materials. After you start working around these areas you can sand down to the bubbles then you have to fill them. The problems really start happening when you sand through the tooling gel down to the actual fiberglass. If there was a happy place for bubbles, it's right below the gel. There was one real big sore spot on my dash when I got it, it was in the upper left hand corner of the TV area, shown with red arrows in the picture above. There was a huge bubble below the tooling gel, and when I started sanding that area it caved in. It was a pain in the butt, but I kicked it's ass! Damn another pun..... You can see what I filled in on the next picture below.
All the areas shown above with arrows needed special attention, allot of filling, sanding, and detail work. For the actual sanding I used 100 grit for the first pass, 150 for the second, and 220 grit for the third. After the 220, I started using the wet / dry type of sand paper starting with 400 grit then stopping with 600 (super fine) grit paper before the primer. When using the wet / dry keep your dash wet and rinse the paper regularly to keep it from clogging. NOTE: NEVER, EVER USE a power sander with the wet / dry type of paper only do this work by hand, you could get electrocuted and or killed. DUGH !
Lets say that you accidentally sanded yourself down to a little bubble, what do you do? Whip up some body filler and smack that stuff all over right? NOT! When you sand it down what's this? All the filler came off and the bubble's still there. Sound familiar? If not, it will. See what's happening here is that the filler doesn't have any way to stick to the dash, the hole simply isn't big enough, so when you sand it, it comes right off. To fix this you need to get a small drill bit and drill all the way through this sucker to the other side. Now the filler has some place to grab on to the dash and it wont come off when you sand it.
Let's say you continued sanding all the way through the tolling gel, as you are grinding away you find a small area with tons of air bubbles right? What do you do? Rip out that drill and start drilling each hole? Double NOT! Here's what you do, sand down the area until you get rid of most air bubbles then build the dash back up with fiberglass filler. I took off around 1/8th of an inch or so of the dash, and built it back up in several locations. It seems to work quite well.
If you run into a corner or anywhere else that is really thin, ( I had spots you could see light through) you need to back the area's by adding fiberglass filler to the back of it. This is especially true on the corners of the dash, if you don't do this it can crack quite easily with enough pressure (such as someone accidentally knee-ing ** is that a word?** your dash on the way in to your car.)
From here on out it's labor intensive work sanding, filling, and sanding some more. Make sure you have the piece of plastic covering your voice box hole until your completely done painting (not the good final cover either, the one you made for the sanding. This is why you made two of them.) The more time you take doing this work the absolute better your dash will look after the final coat of paint. When you think your all done, shoot your dash with a thin coat of primer. When the paint dries sand it down with the 400 grit wet/dry paper. Now you can see everything you missed, all the dips, small bubbles, etc. You may even have to re-sand everything till the primer is no longer on the dash, but this is good, because this means you fixed all the problems. Run your clean hand over the dash, this is a good way to detect defects in the surface. After you have sanded your fingers down to the bone, and your finally ready for paint this is what you do....
Wait a second, we didn't talk about paint! There are two kinds, there is Lacquer and there is Enamel it's your choice on which to use, BUT you got to make sure that the primer is compatible with the finish coat. Lacquer primer wont let Enamel stick to it properly, and vise-versa. If you do make this mistake your paint wont stick, and it will start to wrinkle, and basically look like shi*. Period. I know, I did this when I was working on my truck, man was I pissed. (but not quite as pissed as when Windows 98 crashed earlier.) Anyhow.....
Smack the dash with 3-5 coats of primer, sanding in between each coat after it dries with the super fine 600 grit wet / dry. This is a good base for your actual finish coat. After the final layer of primer has dried, wet sand it with the 600 grit paper, then clean it thoroughly and let it dry over night.
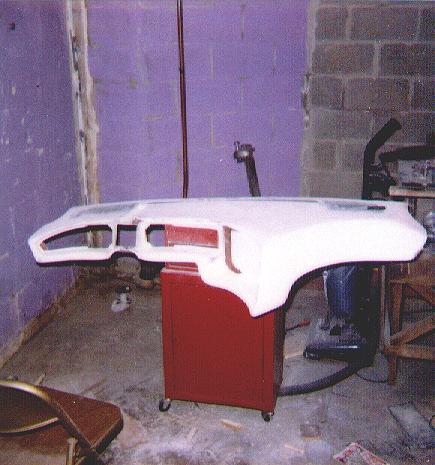
It's final coat time, dust off your dash making sure there is not a speck of dust any where on it, especially in the speaker grills. If you don't this dust will get blown out on to the dash when you are painting and ruin your day. I shot my dash with about 5 cans worth of black paint, however I didn't sand in between each coat of the black, and it shows. You probably should sand in between each coat, It'll make all the difference in the end. You should have something as pictured below:
There you have it a nice perfectly painted Knight Rider dash, now comes the fun stuff, installing it.
© Property of Knight Technology http://knighttech.tripod.com