Part #3 -- Templates / Holes
![]()

![]()
( This is a big page to load )
You will need to cut several holes in your dash, in order to do this you will need to know what your going to put in your dash. If you decide to put in a 9" TV now and cut the hole for it then later decide you only want a 5" TV in there you got a problem. Plan out your project so this stuff cant happen, the best bet is to buy or make all the stuff you plan on sticking in the dash before you start cutting holes. This will include the following: TV, Gauges, Voice box, lights on top of the dash, and anything else you want to add to YOUR dash. Go ahead and install some items in your dash that were not in the show, how about a speed control for your scanner, a cassette player, special gauges, or a garage door opener ? It's your conversion so make it personal... one of a kind. When you have all these items before you, you can easily make templates of these things by measuring or tracing around the items. After you made the templates you can either draw around them or stick them with tape to your dash to see exactly where everything should go.
This is probably a good place to tell you what I used to cut the holes with. One night I was watching TV and saw a hand power tool much like a Dremel that could cut holes easily in just about anything. So I got to thinking if I could get that blade for the Dremel I wouldn't have to make 3 easy payments of $39.95 for this tool on TV. Shure enough after I looked around the home supply store I found the correct bits around the Dremel supplies for about $6.00 a piece. These new bits for the Dremel allow you to cut holes much like you could with a router or jig saw, you don't even need to cut a pilot hole to start just plunge it in the work. These bits cut clean, fast, and accurately. ( If you guys don't know what I'm talking about you need to watch more late night paid programming TV ) Note: These tools can also take a huge chunk out of your finger, arm, or any other body part, so be CAREFUL !! I recommend a AC powered, not battery powered multi speed Dremel tool with these bits to cut holes in a dash..
Always remember the golden rule "measure twice - cut once" this will stop you from making unnecessary holes which will take more of your time to fix. I started my dash by cutting out the holes for the left and right sides of the dash, this is where the gauges will be mounted. The following picture will show you how I did that.
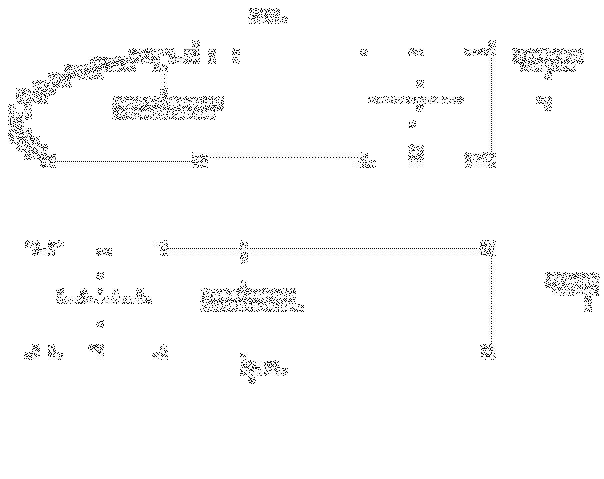
Notice that I had to cut out extra pieces to make room for the Speedometer and Tach that are 3-3/8" in diameter. If you use digital or smaller gauges this will not be necessary. This is where you will need to make a template to fit a Plexiglas cover into these openings so you can mount your gauges. The cover your going to make should overlap the 1/4" lip you left on the dash so you can run small sheet metal screws through it to secure the cover plate. You should not drill the holes for the screws until you made the cover plates. This way you can fit the covers then drill the holes, they will line up perfectly when you go to screw it down.
Question: Why would you cut those pieces out, why don't you just mount the gauges directly to the fiberglass?
Answer: Those sections are not even, and thin compared to the rest of the dash. I believe that those sections are made to be cut out. Not to mention that you need the holes like this if you ever plan on upgrading to digital gauges.
To make the cover plate use your template you made for the left and right side of the dash they should look like this:
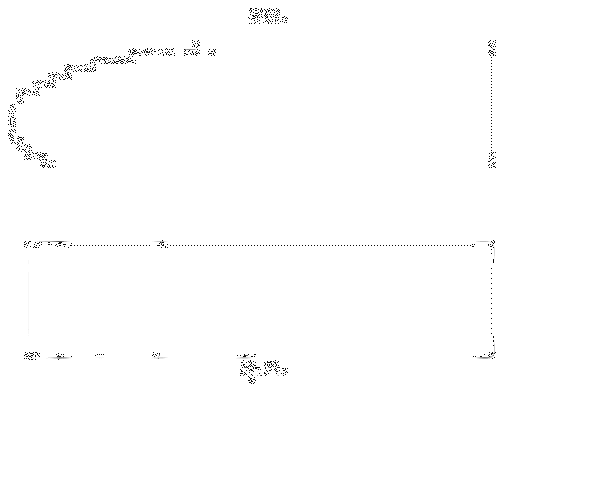
Transfer your template to a piece of Plexiglas then cut it out, I used a jig saw with the correct blade for this. After you have this done you can fit the covers to the dash and drill the pilot holes for the retaining screws ( I used small sheet metal screws.) It helps if you have someone hold the cover to the dash while you drill because the dash is not flat, it curves outward on the left side. When you have all your pilot holes drilled take your covers out and drill the holes one size bigger on the cover ONLY. This is so when you go to screw the covers on, the only part that the screw will thread into would be the dash, this also helps to keep the cover from cracking when the screw bottoms out.
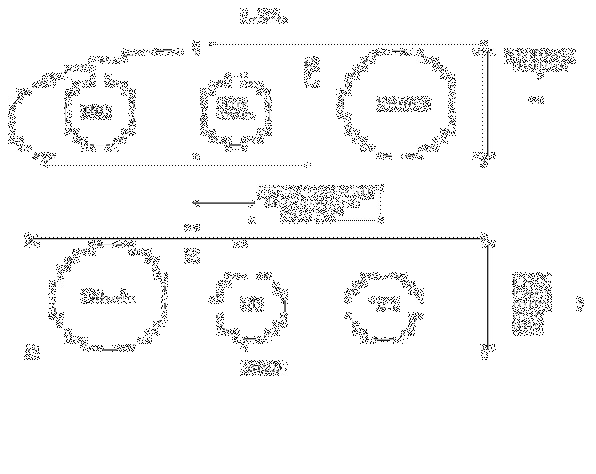
Next you will need to figure out where your going to mount each gauge ( don't forget about turn signals and high beam indicator.) After you got an idea where you want them, place a strip of masking tape near the center point for each gauge and mark a dot in the EXACT center of where you want the gauge. Mount your cover plates to a 1" thick board with the correct screws. Using the correct size hole saw for each gauge, cut out the holes for the gauges using the dot as a reference to start the hole saw. I used a drill press for this and went very... very.... slowly while cutting, it turned out perfectly. Below is a pic of how I laid out my gauges to give you an idea:
Dismount your cover plates from the wood and clean with glass cleaner. After they are all spiffy clean, flip them over to the back side -- THIS IS IMPORTANT --you should now be looking at the side of the covers that will face toward the engine compartment when mounted. Get some gloss black paint and apply 2-3 coats on the BACK SIDE ONLY. When the paint dries you have completed your cover plates.-- Check it out, if you flip them right side up you now have a piece of shiny black Plexiglas to mount in your dash, pretty neat Hugh, the same technique is used in the making of the tail light blackouts. (except you don't want any light coming through on your dash.) You can do this part of the project any time or after you have sanded, filled, and painted the dash. If you do it before, it will save you scratches in your newly painted dash when you drill the pilot holes for the cover plate mounting screws.
© Property of Knight Technology http://knighttech.tripod.com