Part #2 -- When you receive your dash
![]()
This has to be one exciting moment in your life. You paid a chunk of change for that dash and when it comes it's better than Christmas. Be aware that it does take some time for you to receive it. The supplier has to make the dash, crate it up in a box, and have it shipped by truck to where ever it is that you are. It may well be 3-4 weeks or more before you get it dumped on your door step. I had a big hassle with the shipping company mainly because I live at night and 99.8% of the population does not. It was hard to set a time when I was up and they could deliver it. I could write pages about this, but I wont, all that matters is that I received it. When you get it it will look something like this:
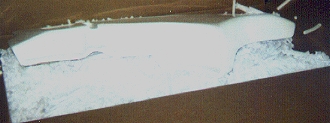
It comes in a huge box filled to the brim with Styrofoam packing ( about 4 big garbage bags worth. ) When you handle your dash when it is first shipped you should wear gloves because there will be fiberglass particles on it. Carefully remove it from the box and sit it a side. Check the rest of the box for anything else you may have ordered then dispose of the box and foam. Now you got something like this:
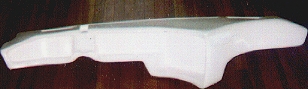
Check it for any damage that may have occurred during shipping. If there was any damage you had better get in contact with the person you bought it from and or the shipping company. The dash should of been insured by the supplier incase of any damage that may happen during shipping.
When your moving your dash around be aware that it is bulky and vulnerable to being hit accidentally especially the outer edges. The dash really doesn't weigh allot, probably 20-30 lbs. if that much. It makes you think that you can just swing that sucker around and get it to go where you want it to, until you hit the edge of that door way and stick a crack in your new dash. Just be aware.
Since you got the thing, your probably anxious to see it in your car. Ok, well if that's what you want to do. This is where I got in a hurry and buzzed of my defroster duct. You need to take out your factory dash pad by removing several screws from underneath the front of the dash pad and ( I believe ) 4 screws in the defroster duct. After these screws are out the top of the dash will pull right out. You will have to remove your steering wheel to slip in your dash without damage, consult a service manual for that one. Now your ready to test fit your Knight dash, yes it'll fit but this will give you a chance to see how it's going to change the look of your car. If your car has T-tops it would be a good idea to remove them to give you more room. Go get a friend and tell them to sit in the passenger seat. Now pat them on the head and say "good friend !..... good !!" Make sure you both have gloves on.
Hand them the passenger side of the dash and the both of you can place it where the stock factory dash pad was. Notice that there will be little room for the ignition switch, you'll most likely have to move the headlight switch and your tilt steering will almost have to be straight out. Now you can start to picture you project in your head-- think gloss black, gauges mounted, TV installed, long legs, tight shiny spandex (oops, day dreaming again.) << smack >> (girlfriend didn't like that) It's always good to have a plan on how things are going to look when your done, this is the time to do that.
After you get done, carefully remove you dash from the car and start your project. (and give your friend a Scooby snack for helping.)
© Property of Knight Technology http://knighttech.tripod.com