Now that you have an opening for a scanner don't you think you'd better build one? This was the first thing I built for my conversion in late 1999. Wrote a page 'bout it, want to see it ?, Here we go....
Before you do anything read the disclaimer on this site.
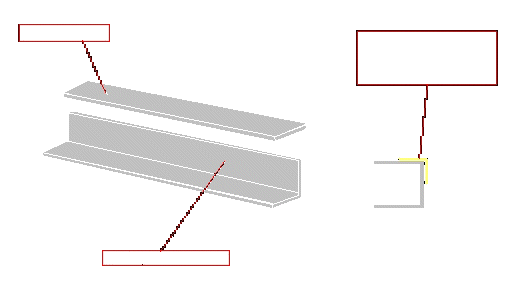
Ok go to your local hardware store and pick up: 6 L-brackets, pop rivets, a piece of plexi-glass (preferably red or what ever color you want your scanner to be, it can be clear and painted with stained glass paint that you can get at any hobby store also), a 2 1/2 to 3 foot piece of L-shaped aluminum ( I believe that mine was 1" x 1" ), and 2 flat pieces of aluminum of the same length and width. Don't forget to pick up a cola since you out anyway.
On the picture below you can begin to see what the plan is. Your going to make a C-channel piece of aluminum. The flat piece of metal is the top, the L-shaped piece is going to be the bottom and back of your scanner. The L-brackets are used to attach the two pieces together and to mount it to the car.
1. Open up you hood, you will need to see the angle of it on the front to bend your aluminum to the correct angle to fit your car.
2. Make a cut in the flat piece of metal in the middle 3/4 the way thru. Heat the area with a torch indicated by the picture below and bend this to the angle of the front of your hood. NOTE: Aluminum has a very low melting temp. so be careful not to melt it. Don't heat it on your hood either.
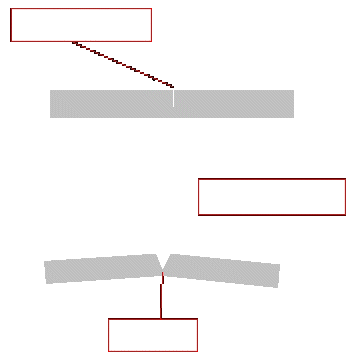
3. You'll need to do the same for the L-shaped piece of metal, but don't cut the back of the L only the bottom. Heat the back and the corner by your cut then bend it to the shape of your hood.
4. The flat piece and the L piece should be at the same angle you can check this by placing the pieces together. If they are not the same heat and bend them until they are the same in relation to the angle on your hood.
5. Next take your two pieces and sit them one at a time in-between your. two turn signals. Mark where you will need to cut them for length so they will fit. Then cut your two pieces.
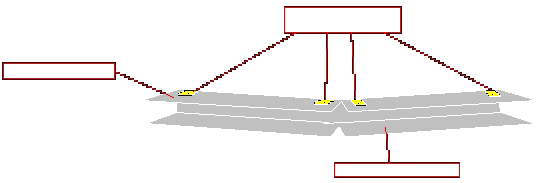
6. Now we need to connect the two pieces together. Using 4 L-brackets and pop rivets connect the pieces together by riveting through the top and back of your new scanner as shown in the picture below. Yours should look similar to the pic below when your done.
7. Take a break, drink your cola.
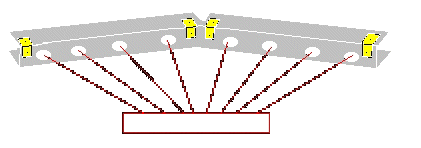
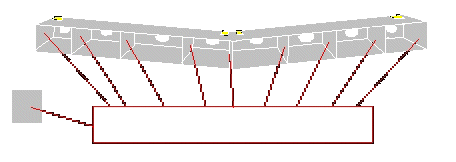
8. For the next step you will need to locate 8 lamp holders, I bought mine at Advanced Auto Parts / Parts America / Western Auto or whatever they call themselves today, but I absolutely do not recommend buying them there. It took over 2 1/2 months to order all 8, all due to F-ups by them. You will need to judge what size of lamp you want to use so that it will fit in your scanner. I used GE 1003 light bulbs and the correct sockets for them. On the back of the package of the socket it will tell you what size of hole to drill for it to fit. Get the correct hole saw to stick in your drill, then evenly mark out 8 spaces where you want the lights to go, and cut the holes in the back of your scanner as shown.
9. Now that you have an idea of where your lights will go, we need to create dividers between the individual light bulbs and end caps for the scanner bar. This is why you bought 2 straight pieces of aluminum. Cut out 9 square pieces that will fit into your scanner bar as dividers. (some grinding of the pieces may be required to get them to fit in each space.
10. Go get some J.B. Weld and mix up as directed on the package. Use this stuff to mount the dividers and end caps. I also used this stuff to seal the top of the scanner to the bottom half. Go ahead go crazy-- make sure no light can get out of the scanner or in-between the dividers, fill in the gap in the middle of the scanner (you may need to back your work with tape so it wont drip down). I didn't believe this J.B. weld stuff would work as it says on the package, but it does it's hard as rock and I have had no problems with it. Think of it as really incredibly strong body filler. You'll have to let it sit overnight so drink your cola and go do something else till tomorrow.
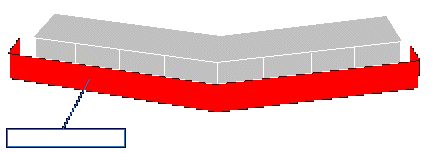
11. Next we need to make a cover for the front. Cut a piece of Plexiglas that will fit the front of your scanner, but make it long enough to bend around the sides of the scanner, this is how you secure it. If you got the correct color plastic congrats ! If not you can use a clear plastic just spray it with stained glass spray paint that you can get at a hobby store. You will need a heat source to bend the plastic to the contour of your scanner and around the sides. See picture below. WARNING : If you plan on using the spray paint method you MUST bend the plastic FIRST then paint it because we all know the flammable nature of spray paint don't we? I used my lighter which is a mini torch. BE CAREFUL !!!! Don't burn yourself . Plexiglas will start on fire if exposed to extreme heat, and if it should melt onto your skin it will stick and burn BAD !
12. Now that your back from the hospital, paint your scanner banana yellow. (Actually I painted the outside black and the area around the light bulbs white to reflect more light out of the scanner)
12-1/2. Drill two holes for two screws that will secure the plastic to the front of your scanner. Attach it.
13. Looking good hugh ? Alright now we need a way to secure it to the car. Go get those other 2 L-Brackets drill and pop rivet them as shown below.

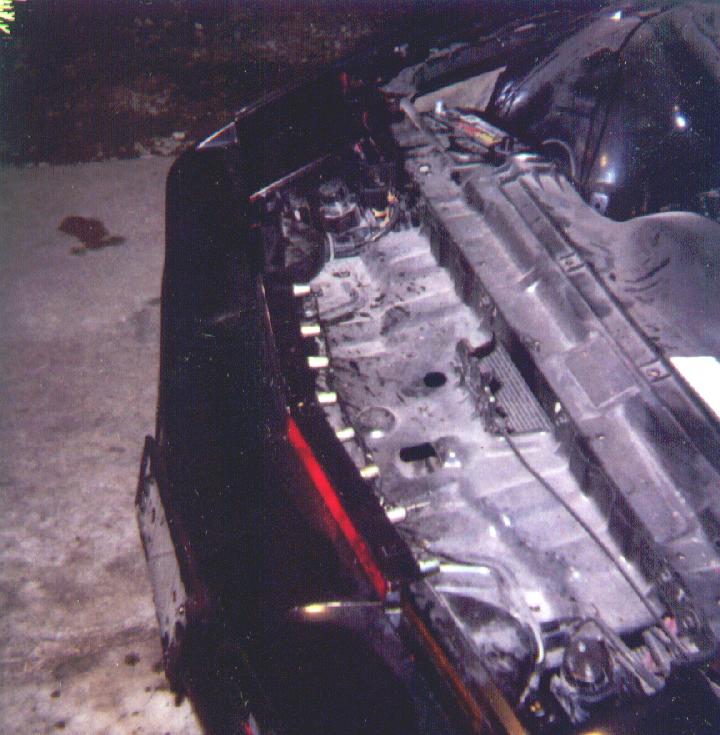
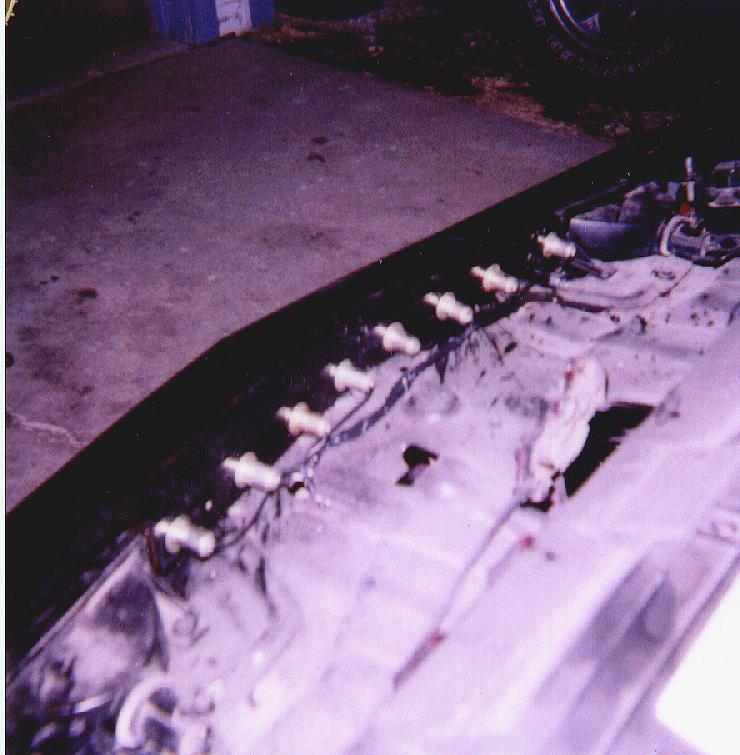
14. Drill the appropriate holes on your car and mount your new scanner in the area between the turn signals. (We did do the stock nose conversion didn't we ? )
15. Insert your light bulbs in the sockets you bought and stick them in your scanner.
16. Buy a JC scanner and see the section named "Scanner Electronics"
When everything is complete it should look like this :
Or this :
( Not the best picture, but just how many of these do you see on the net ? )
© Property of Knight Technology http://knighttech.tripod.com