Part #6 -- Mounting da' Dash
![]()
By this point your all excited to get your dash in the car, ya' just got to know how it's going to look, you are in a hurry.
Don't be !
When you get in a hurry things tend to get screwed up, in this case you have a freshly painted dash, take your time to do this right and not put a big scratch in the finish while installing it.
This is a two person job, so go grab your friend to help (you may need those Scooby snacks to lure them to your place again.) Tell them to sit in the passenger seat, this will be just like when you first test fitted the dash when you just got it. This time you don't really want to screw up the paint so try to handle the dash from the underside as much as possible, make sure the both of you are wearing gloves, the underside is unfinished fiberglass. Again remove the T-tops if your car has them for more working room and also remove the steering wheel.
You will want to get some of that foam insulation, the kind that is about 1" high and has sticky tape on the back of it. Place it around the outer ends of where the dash will be, especially behind the speakers, defroster duct, and on the passenger side near the door window. This is to eliminate any noise that may come from the dash hitting the surface below when your car goes over bumps while driving. If you don't do this I guarantee that you will wish you did, particularly if your car is a daily driver.
Now would be a good time to let you in on a secret..... Don't tell anyone, but when you install your dash, you cant get to the darn ignition switch, it completely covers it. I heard of two ways of dealing with this, either re-locate the ignition switch or get some pliers and bend off those little tabs that are on either side of the key hole. I couldn't see how removing the tabs would help, you still would have a heck of a time turning the key so I decided to relocate the switch to the console. When doing this I had to make sure that the factory ignition switch would stay in the run position so it wouldn't lock the steering column accidentally while driving, I simply used a plastic tie wrap to do this. So keep this in mind it will be a problem when you go to install the dash. .
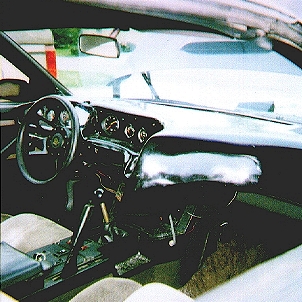
Next, get the dash and have your friend help you position it in to the car. Attach the Knight dash by screwing the 4 screws in to the defroster duct holes that you previously drilled. Keep in mind that if you over tighten fasteners on fiberglass it will crack. You may notice that your dash is "wavy" on the top. (or at least mine was) This happens when you screw down the mounting hardware, you may need to use a piece of plastic or wood as a shim underneath the dash to straighten it out.
Since I screwed up on my dash I had to give it extra support by placing 1"x 3" blocks of wood underneath the dash on the passenger side. They go right on top of where the factory dash pad had several screws holding it down, I glued these blocks with construction adhesive to the underside of the dash, then ran a screw through the block of wood at the factory hole location. When the glue set it made the passenger side of the dash rock solid. Just make sure that the screws (if you do this) are not long enough to screw through the top of the dash.
After I installed my TV I noticed that that section of dash was hanging a bit low because of the weight, it didn't look quite right. So I had to fabricate a support for it, I used a steel dowel and a "L" section of steel to accomplish this. I cut the "L" section of steel to the approximate length of the bottom of my TV, then I drilled and tapped the hole in the middle of the bar to accept the dowel that I also cut treads on. I bent the dowel so it would come as close to the console as possible and be out of the way. (and so it wont be noticed.) I cut treads with a die on the other end of the dowel and used 2 nuts and 2 washers to anchor it to the console. The other end of the support was attached to the dash right below the TV with 2 screws. This area of the dash will not move under any circumstances and it made the dash even and level with the weight from the TV. I adventually painted the support black and no one seems to mind it. I could cower this up if I ever added on to the console so it would come up and mate with the underside of the dash. You may not have to do this support modification, it may have been a result of me cutting off my defroster duct, when I screwed up. You can see the support unpainted in the pic below.
Since my car was a manual tranny equipped car, there was a little problem with the shifter. It seems when you tried to shift into 5th gear you would bang your knuckles or the shifter knob on the dash, we cant have this. It was a simple problem with a simple solution. Make the shifter shorter. In order to do this you will need to remove the shifter stick from the car and shorten it by about 2 or 2-1/2 inches. All I did was cut the top of the stick with a hack saw (this is easy the stick is a hollow pipe), drilled out the threads in the shifter ball and glued it back on to the stick with construction adhesive. I can guarantee that the shifter knob will never come off that shaft, construction adhesive (for the most part) is permanent. Not only does the shifter clear the dash and look good, but now you can fly through the gears because you have to move your arm less with the shifter shortened. This modification is not shown in the picture above.
Ever wonder why in the TV show they never seemed to show the dash where you could actually see the parts of the factory dash underneath? Because it looks like Doo Doo. I plan on some day painting this area black so it doesn't stand out so much and possibly adding plastic to the underside of the dash so it wont look "hollow" underneath. I had this problem when I went to get new tires and they stuck it up on the lift. They opened up the door to see the odometer for mileage records and boy did it look bad, you could see all the wiring for the gauges and electronics. That's now on my " To Do" list.
That's pretty much it, your dash is installed, now you need to mount your electronics.
© Property of Knight Technology http://knighttech.tripod.com